> For the complete documentation index, see [llms.txt](https://notes.cavementech.com/pentesting-quick-reference/llms.txt). Markdown versions of documentation pages are available by appending `.md` to page URLs; this page is available as [Markdown](https://notes.cavementech.com/pentesting-quick-reference/active-directory/ad-basics/ad-management-basics.md).
# AD Management Basics
### RDP to a windows machine
```
xfreerdp /v:10.129.202.146 /u:htb-student_adm /p:Academy_student_DA!
```
### **Manage Users**
Our first task of the day includes adding a few new-hire users into AD. We are just going to create them under the `"inlanefreight.local"` scope, drilling down into the `"Corp > Employees > HQ-NYC > IT "` folder structure for now. Once we create our other groups, we will move them into the new folders. You can utilize the Active Directory PowerShell module (New-ADUser), the Active Directory Users and Computers snap-in, or MMC to perform these actions.
Each user should have the following attributes set, along with their name:
| **Attribute** |
| ---------------------------------------------------------------------------------------- |
| `full name` |
| `email (first-initial.lastname@inlanefreight.local) ( ex. j.smith@inlanefreight.local )` |
| `display name` |
| `User must change password at next logon` |
### Add a user
```
PS C:\htb> New-ADUser -Name "Orion Starchaser" -Accountpassword (ConvertTo-SecureString -AsPlainText (Read-Host "Enter a secure password") -Force ) -Enabled $true -OtherAttributes @{'title'="Analyst";'mail'="o.starchaser@inlanefreight.local"} /smart-sizing:1400x1080 /f
```
#### GUI
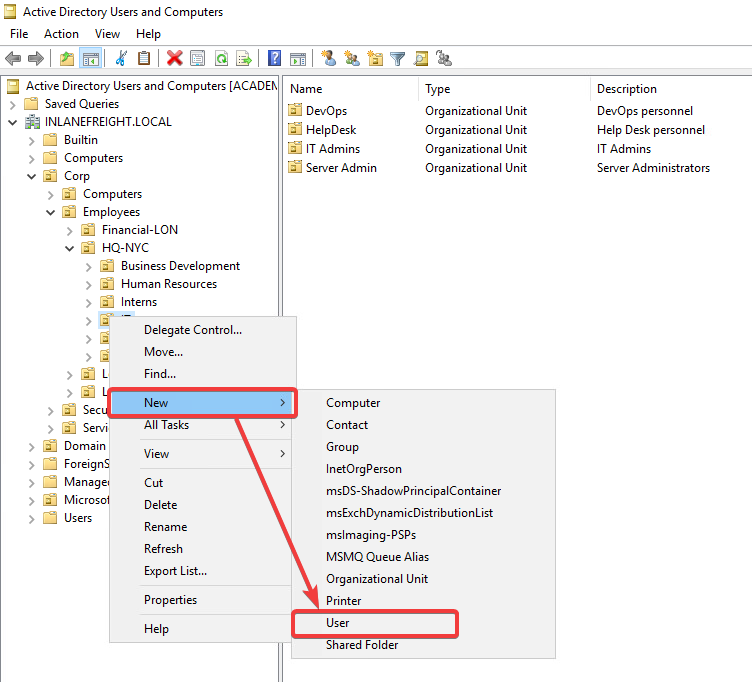
To add an AD user via the GUI we first need to open Active Directory Users and Computers via the Start Menu folder Administrative Tools.
1\. Right click on "IT", Select "New" > "User".
**Add A User**
We will add the new user `Andromeda Cepheus` to our domain. We can do so by:
* Right-click on "IT" > Select "New" > "User". A popup window will appear with a field for you to fill in.
* Add the user's First and Last name, set the "User Logon Name:" as `acepheus`, and then hit Next.
* Now supply the new user with a password of `NewP@ssw0rd123!`, confirm the password again, and check the box for " User must change password at next login", then hit next. Select "Finish" in the last window if all attributes look correct.
### Remove a user
#### Powershell
```
PS C:\htb> Remove-ADUser -Identity pvalencia
```
#### GUI
To delete a user via the GUI, we will use the ADUC snap-in just like when we added a user to the domain above.
### **PowerShell To Unlock a User**
```
PS C:\htb> Unlock-ADAccount -Identity amasters
```
**Reset User Password (Set-ADAccountPassword)**
```powershell-session
PS C:\htb> Set-ADAccountPassword -Identity 'amasters' -Reset -NewPassword (ConvertTo-SecureString -AsPlainText "NewP@ssw0rdReset!" -Force)
```
**Force Password Change (Set-ADUser)**
```powershell-session
PS C:\htb> Set-ADUser -Identity amasters -ChangePasswordAtLogon $true
```
### Add and Remove Computers To The Domain
To add the localhost to a domain via PowerShell, Open a PowerShell session as administrator, and then we can use the following command:
**PowerShell Join a Domain**
```powershell-session
PS C:\htb> Add-Computer -DomainName INLANEFREIGHT.LOCAL -Credential INLANEFREIGHT\HTB-student_adm -Restart
```
This string utilizes the `domain` (INLANEFREIGHT.LOCAL) we wish to join the host to, and we must specify the `user` whose credentials we will use to authorize the join. (HTB-student\_ADM). Specifying the restart at the string is necessary because the join will not occur until the host restarts again, allowing it to acquire settings and policies from the domain.
**Add via the GUI**
To add the computer to the domain from the localhost GUI is a bit different. Follow these steps to join it to the domain:
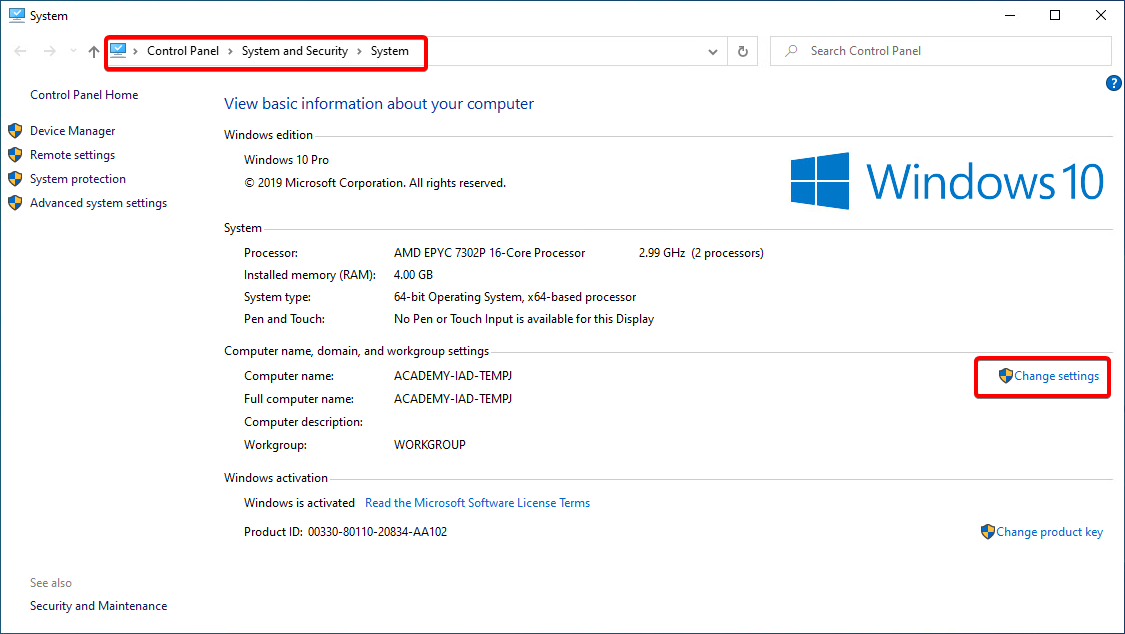
* From the computer you wish to join the domain, open the `Control Panel` and navigate to "System and Security > System."
* Now select the "Change Settings" icon in the `Computer name` section. Another dialog box will pop up asking you for administrator credentials. In the next window, we need to select the change icon next to the portion that says, "To rename this computer or change its domain or workgroup, click change" This will open yet another window for you to modify the computer's name, domain, and workgroup. Check that the computer's name matches the naming standard you wish to use for the domain before joining. Doing so will ease the administrative burden of renaming a domain-joined host later.
* next, we need to enter the name of the domain we wish to join the computer to (`INLANEFREIGHT.LOCAL`) and click OK. You may receive a warning about NetBIOS name resolution. That is an issue outside the scope of this lab. For now, move forward.
* You will be prompted for domain credentials to complete this action. Utilize the domain administrator account you have been given at the beginning of this lab. (`htb-student_adm`).
* If all goes well, you will be presented with a prompt welcoming you to the domain. The computer needs to restart to apply changes and new group policy settings it will receive from the domain.
We are going to use the Windows GUI to add this PC to the domain.
1\. From the control panel, open up system properties for the pc. Click on Change Settings in the Computer name section.
2. In this window, select the Change button beside "rename this computer or change its domain."
3. Enter the domain you wish to join the host to. (INLANEFREIGHT.LOCAL) Hit OK.
4. Enter the domain administrator credentials provided to join the host to the domain.
**Add a Remote Computer to a Domain**
```powershell-session
PS C:\htb> Add-Computer -ComputerName ACADEMY-IAD-W10 -LocalCredential ACADEMY-IAD-W10\image -DomainName INLANEFREIGHT.LOCAL -Credential INLANEFREIGHT\htb-student_adm -Restart
```
When we added the computer to the domain, we did not stage an AD object for it in the OU we wanted the computer in beforehand, so we have to move it to the correct OU now. To do so via PowerShell:
**Check OU Membership of a Host**
```powershell-session
PS C:\htb> Get-ADComputer -Identity "ACADEMY-IAD-W10" -Properties * | select CN,CanonicalName,IPv4Address
```
The CanonicalName property (seen above) will tell us the full path of the host by printing out the name in the
---
# Agent Instructions
This documentation is published with GitBook. GitBook is the documentation platform designed so that both humans and AI agents can read, navigate, and reason over technical content effectively. Learn more at gitbook.com.
## Querying This Documentation
If you need additional information that is not directly available in this page, you can query the documentation dynamically by asking a question.
Perform an HTTP GET request on the current page URL with the `ask` query parameter:
```
GET https://notes.cavementech.com/pentesting-quick-reference/active-directory/ad-basics/ad-management-basics.md?ask=
```
The question should be specific, self-contained, and written in natural language.
The response will contain a direct answer to the question and relevant excerpts and sources from the documentation.
Use this mechanism when the answer is not explicitly present in the current page, you need clarification or additional context, or you want to retrieve related documentation sections.